Some Notes About the Helix |
Material - Plywood or Masonite?
I really can't say that 1/4 inch masonite would be a better material than 1/4 inch plywood. The masonite looked flatter at the home improvement store than the 1/4 inch plywood. It seemed to have suffered less abuse. I suspect one could make plywood work just as well if not better than masonite. If I were doing it again, I might try plywood just to find out. I'd go to a better place than Home Depot to buy it.
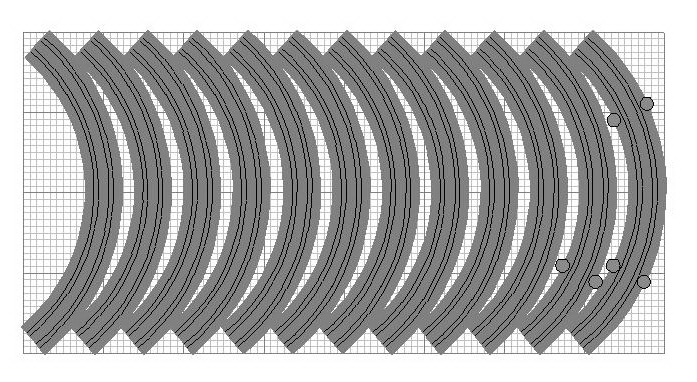
The following illustration shows some helix segments laid out on a 4 x 8 foot sheet. Each segment is a bit more that 1/4 of a full circle. The little "nubs" or ears are shown on one of the segments. Notice that using the little ears rather than the full width allows the segments to be nested a little closer together. There was a little less wasted material this way. The segments are designed in such a way that when they are laminated together with each segment overlapping half of the other, the ears will line up giving seven pairs of ears for each full circle. The segments were cut out with a saber saw. You need a good saber saw for this as it is a lot of cutting.
Assembling the Helix
I built the helix in place, resting the first circle on the cleats that would be supporting the threaded rods. The segments were glued together with the rough sides of the masonite facing each other using a liberal amount of yellow carpenter's glue. I started at the bottom and did most of a full circle with clamps holding the glued pieces tightly together until the glue dried. At this point I carefully drew circles on the masonite locating the inner ends of the track ties for both tracks. Then I did another circle and so on until I reached the required number of turns. I was able to keep clamping things together tightly as there was no track yet, just the stack of previously laminated masonite. At this point the helix coils were flat, laying on top of each other like a big slinky.
Next I drilled the holes for the threaded rods down through the ears on all the layers and the supporting cleats on the benchwork. In hindsight, I should have drilled the holes at a slight angle, but didn't because at the time I didn't realize that the holes would move back slightly with respect to each other as the helix was raised. Making the holes slightly larger or tilting the drill in the helix uphill direction a few degrees would have been helpful. In any event I was able make the rods vertical with a certain amount of pushing and shoving and a few bad words. I used a nut and washer under each layer and on top of each layer. That's all I needed. Because of the way the lamination was done with overlapping segments, the joints are all well away from the ears and the laminated masonite is very strong at the threaded rods. Using a plumber's level I set the grade on each helix turn making sure the helix was level from side to side and that the grade was consistent for both tracks.
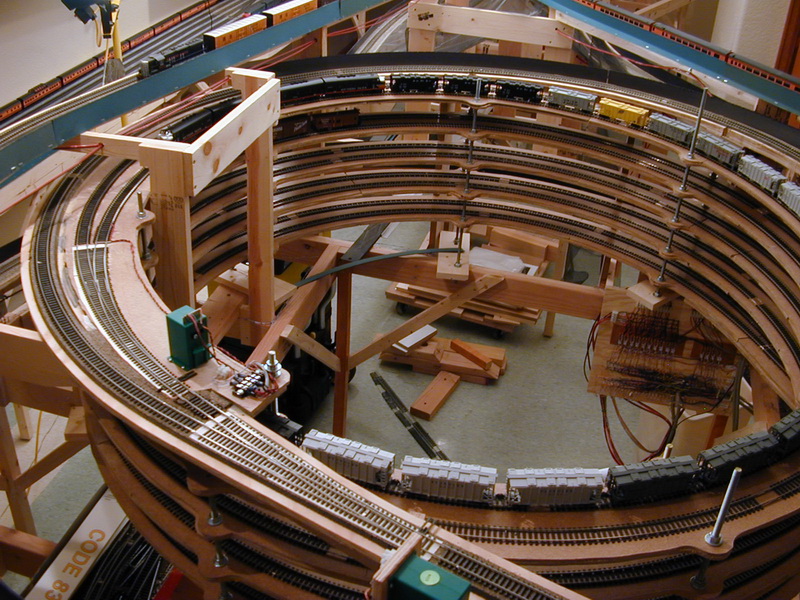
The next photo shows a section of completed helix. I know the masonite looks like it was cut out by a beaver, but this just proves that you don't have to be good carpenter to do this sort thing successfully. We're not building furniture here you know.
Installing Track
Then I glued the flex track directly to the masonite lining up the tie ends with the marks I made earlier. Some people say attaching the track directly to the masonite (or plywood) is too noisy. Maybe so. But I can hear things in there when trains are running OK and when they are not. One must be very careful not to introduce kinks in the flextrack. I have some aluminum curve templates that fit snugly between the rails. These were invaluable in getting all the kinks out of the curves. I also soldered all the joints before curving the flex track. One should also be careful to ensure that the rail ends line up evenly without any dips or bumps at the joint. Also file away any excess solder at the joint. It pays to be fanatically meticulous about all of this.
In spite of all the care I took about fastening down the track it did move in a few places where I didn't get it glued down properly. In order to remove the kinks that developed because of this, I had to cut some expansion/contraction joints. I did this carefully and with a great deal of trepidation at several places where the track was already securely glued down and in the correct alignment. I used a very fine toothed little saw, taking care not to bend the ends of the rails. Miraculously, the track did not develop new kinks where I cut it.
Some Design Parameters
I didn't use cork roadbed here because I wanted the extra clearance. The helix coils are 3 inches apart. The rise per turn is 3 1/2 inches. The inner track radius is 27 3/4 inches. The outer track radius is 30 inches. This results in a grade of 2.00% for the inner track and 1.86% for the outer track. Considering the height of the track, there is a little more than 2 3/4 inches of clearance from the railhead to the bottom of the next level. This adequate for all of the equipment that I run.
Results Thus Far
The helix has been stable for about nine years with no warping or sagging. However the climate in Fort Collins is dry with the humidity ranging from dry in the summer to extremely dry in the winter. Our house has central air conditioning and heat. During the heating season I run the whole house humidifier that is built into the HVAC. Consequently the layout temperature and humidity fluctuations are relatively small. I have heard that masonite helixes can be troublesome in more humid climates.
I've not had any trouble with string-lining even though I have pulled some fairly long trains up through the helix. I use metal wheels on everything and try to make sure all the equipment is free rolling. I also try to weight all the cars more or less properly and consistently. None of the curves, in the helix nor anywhere else are super elevated because I was concerned about string-lining on the steeper grades. Super elevation can look really cool, but I'd limit it to flatter areas.
I really haven't thought about trying to find the maximum train length for the helix. I've been able to pull the train lengths that I wanted. My shortest siding is about 16 feet. I pull trains that long through the helix with consistent reliability. I have a couple of freights set up with one cab forward at the front, one in the middle, and one at the end. These trains are around 30 feet long and operate in both directions through the helix also with consistent reliability. I also operate passenger trains with 11 or 12 full length cars through the helix reliably.
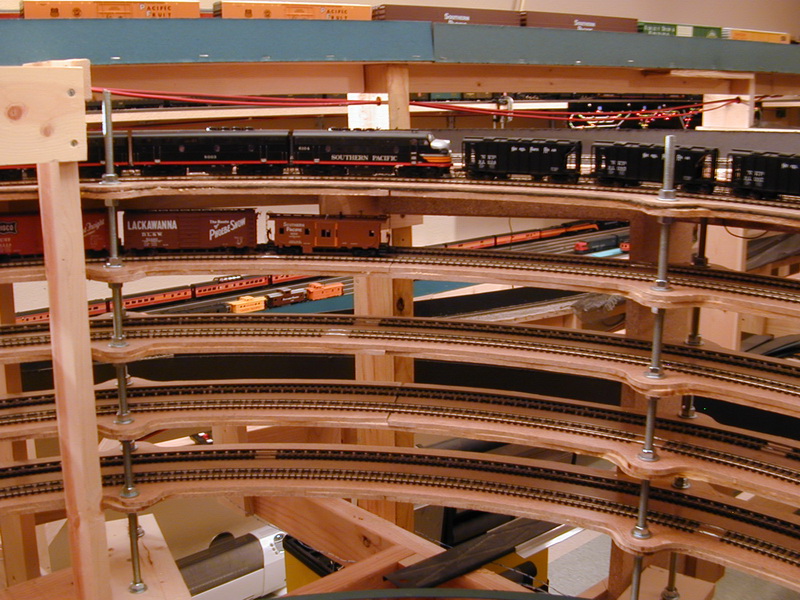
Another shot of the finished helix follows.